Sunday, November 22, 2009

Oh No! Where’s My Eggo?

Kellogg is rationing its Eggo products due to flooding and equipment problems at two bakeries. The shortfall could last through mid-2010.

Flooding at an Atlanta bakery during heavy rains in October forced Kellogg to shut down production temporarily. Plus, equipment at Kellogg's largest waffle facility, based in Rossville, Tenn., needs extensive repairs.

Apparently remaining inventory will be rationed to stores across the country based on historical percentage of business.

You could always make waffles from scratch or with homemade Bisquick. It’s almost as fast as the toaster, and probably tastes better too.


Read more!

Friday, November 20, 2009

Brown Sugar Apple Cheesecake

Apple CheesecakeI love cheesecake. But apple cheesecake is not my favorite. With that said, I was up for the challenge to come up with a recipe that worked for me. Let's just say my first venture into the land of apple cheesecake was a complete disaster. I used Granny Smiths and sautéed them much like this recipe calls for. But the apples were still too moist, allowing their juices to mix into the cheesecake batter making for a gloppy mess. This time was different thankfully.

Apple CheesecakeI adapted my base cheesecake recipe with some added brown sugar, apple pie spice (usually a mixture of cinnamon, nutmeg and allspice) an d apple cider. The apple cider gave it a hint of apple flavor but the star of the cheesecake are the apples themselves. A surprise layer of sweet and caramelized apples are hidden inside this cheesecake. They came out tender and didn’t mess with the texture of the cheesecake batter.

Apple CheesecakeI used Fuji apples this time and I was pleasantly surprised. They don’t fall apart in the frying pan, they hold their texture and even caramelize beautifully with a little added brown sugar. These are my new favorite cooking apples.

Apple CheesecakeThe ginger snap crust was great with some added cinnamon and brown sugar. Although the cookies are strong flavored, the crust didn’t overpower all the other flavors.

Apple CheesecakeOverall, this cheesecake is a winner. But now I want to try the recipe with the apples ON TOP of the cheesecake, drizzled with some caramel sauce. That sounds even better.

Printable Version
Filling

4 (8 ounce) packages cream cheese

1 c. brown sugar

½ c. white sugar

¾ c. milk

4 Tbs. apple cider

4 eggs

1 c. sour cream

¼ c. all-purpose flour

1 ½ teaspoons apple pie spice

Apples

4 tablespoons butter, divided

3 large Fuji, peeled, cored and cut thinly, divided

2 tablespoons brown sugar, divided

Crust

1 ½ c. ginger snap cookie crumbs

2 Tbs. brown sugar

4 Tbs. melted butter

½ tsp. cinnamon


Directions

For the Apples

In a large skillet, melt 2 tablespoons butter over medium-high. Stir in half of the apples and cook, until they are golden and limp, about 5 to 10 minutes. Scatter the apples with 1 tablespoon brown sugar and cook, tossing to coat, for 1 minute. Scrape apple mixture onto a plate and repeat with remaining apples, butter and sugar. When done, set aside to cool.

For the Crust

In a medium bowl, stir together cookie crumbs, brown sugar, and cinnamon. Drizzle in butter and stir to moisten the crumbs. Scoop crumbs into a spring form pan coated with nonstick spray and firmly press them over the bottom and up the sides of the pan. Place pan into a preheated oven at 350 degrees and cook for 10 minutes, until the edges are golden. Remove from oven and allow to cool.

For the Filling
  1. Triple wrap bottom of spring form pan with the wide version of Reynolds foil.
  2. In a large bowl or stand mixer, mix cream cheese with sugars until smooth. Blend in milk and apple cider, and then mix in eggs one at a time, mixing just enough to incorporate. Mix in sour cream, apple pie spice and flour until smooth.
  3. Pour about a third of the filling into the prepared crust. Add the apples as an even layer, and pour the rest of the filling on top.
  4. Use a water bath for the cheesecake. Put spring form pan in larger rectangular pan. Set in oven, and add water until about 1-2 inches high on spring form pan.
  5. Bake in preheated oven for 1 hour. Turn the oven off and leave cheesecake to cool, about 2-3 hours, to prevent cracking from cooling down too fast. Then remove from oven and set on counter to finish cooling to room temperature.


Read more!

Wednesday, November 18, 2009

fastfood@home: Taco Bell Seasoning

Taco Bell Seasoning Copycat In my post a few weeks ago I talked about the MSG in Taco Bell’s seasoning packet that you can find at the grocery store. Well I’ve scoured the Internet to find a great alternative to those packets. And I have to say, I was pleasantly surprised by the spice mixture. It gives great flavor to the taco meat without that added greasy flavor from those Taco Bell seasoning packets.

When I do buy those packets from the store, I never use the whole thing for one meal. Half a packet works for me because I find the flavor to be way too salty using the full packet. This recipe is no different. 1/2 to 3/4 of the spices is all you need with the 3/4 cup water.

Taco Bell Seasoning Copycat

If you want to avoid the MSG entirely, leave out the beef boulion granules as they contain a small amount. Like all recipes, this one isn’t set in stone. If you like a little more spice add some red pepper flakes or other spices to fit your tastes.

Printable Version
Ingredients
  • 1 tablespoon all-purpose flour
  • 1 tablespoon cornstarch
  • 1 tablespoon dried onion flakes
  • 1 teaspoon beef bouillon granules
  • 1 teaspoon garlic salt
  • 1 teaspoon ground cumin
  • 1 teaspoon paprika
  • 1 teaspoon chili powder
  • 1/2 teaspoon onion salt
  • 1/4 teaspoon cayenne pepper
  • 1/4 teaspoon granulated sugar
Directions
  1. Combine and store in an air-tight container.

  2. Notes: To make taco meat, brown 1 lb ground beef in skillet; drain.

  3. Add seasoning mix and 3/4 cup of water.

  4. Bring to a boil then reduce heat.

  5. Simmer uncovered, 2-5 minutes, stirring occasionally.

Read more!

Monday, November 16, 2009

Oat-Nut Pancakes

Oat Nut PancakesTired of plain ol’ pancakes? It seems many restaurants have a fascination with thick, heavy pancakes. They’re so thick, they barely get a chance to cook inside, leaving a funny, floury after-taste. They may even go so far as to call them “fluffy.” But as you near the end of your breakfast, you realize you’d rather not see another plate of pancakes any time soon.

There’s really not much to pancakes. It’s basically flour and water or milk. Not exactly the most nutritious by the time it’s drizzled with syrup and butter. But enough preaching. I wanted to try a different take on the regular pancakes. This recipe is said to be a copycat of Ihop’s Harvest Grain & Nut Pancakes. I’ve only eaten at Ihop once so I can’t say if these taste like them or not. But I will say this is a welcome change to Bisquick-style pancakes.

Oat Nut PancakesI ground up the oats and mixed all the ingredients together. Once my pan was hot enough I added the batter and waited for the first side to get done. It seemed to take a little longer for these to cook compared to regular pancakes. My pan was lopsided on the bottom so that may have had something to do with it. But I soon found they do indeed cook differently.

Flipping the pancakes was a more delicate process than I’m used to. I had to wait to flip them until the top batter was almost dry. Once I realized how they cook, the rest of the process was easy.  

Oat Nut PancakesAnd the small amount of extra effort paid off. They turned out pillowy, and I mean that in a good way. The syrup didn’t just run off the top, it soaked into every nook and cranny it could, almost like a sponge. The taste was hearty and wholesome from the wheat flour, the oats and walnuts. While the buttermilk helped give it a slight zing.

As for my crappy frying pan? It’s about to be traded in for a nice griddle. That’s the one thing I’ll be after during all these crazy Black Friday sales.

Printable Version
Ingredients
  • 3/4 cup Quaker Oats
  • 1/2 cup whole wheat flour
  • 1/4 cup all-purpose flour
  • 2 teaspoons baking soda
  • 1 teaspoon baking powder
  • 1/2 teaspoon salt
  • 1 1/2 cups buttermilk
  • 1/4 cup vegetable oil
  • 1 egg
  • 1/4 cup sugar
  • 3 tablespoons chopped walnuts
Directions
  1. Lightly oil a skillet or griddle, and preheat it to medium heat.

  2. Grind the oats in a blender or food processor until fine, like flour.

  3. Combine ground oats, whole wheat flour, baking soda, baking powder and salt in a medium bowl.

  4. In another bowl combine buttermilk, oil, egg and sugar with an electric mixer until smooth.

  5. Combine dry ingredients with wet ingredients, add nuts and mix well with mixer.

  6. Ladle 1/3 cup of the batter onto the hot skillet and cook the pancakes for 2 to 4 minutes per side or until brown.

Read more!

Friday, November 13, 2009

Magic Cookie Bars

Magic Cookie BarsLayers of chocolate, coconut and nuts with sweetened condensed milk and graham cracker crumbs. Sounds good doesn’t it?

This is one those easy favorites anyone can make. There’s recipes all over the net and you can even buy a kit from the grocery store by Eagle Brand (they’re the ones who make sweetened condensed milk.) I definitely had graham cracker crumbs left over from my fanatical cheesecake baking a few months ago. But I was out of sweetened condensed milk. Yet strangely, I had all the ingredients to make homemade sweetened condensed milk, so that’s what I used.

I just added the graham cracker crumbs with the butter and pressed them down to form a good, solid crust. And then I just layered the sweetened condensed milk, the chocolate chips, coconut and nuts on top, and that was it.

The coconut gained even more flavor from baking and they turned into a great crunchy topping. You’ll definitely need a plate because the coconut does fall off fairly easily.

Magic Cookie BarsMake sure you have a house full of kids or some company so they can disappear quickly. Maybe it’s just my sweet tooth but I have a tendency to eat all the treats I make by myself. As a kid I could easily eat 3 to 4 candy bars a day. By 18, I was out on my own and rarely ate a candy bar. Nowadays I’ve moved from the candy bar to fattening treats. What could go wrong?

Magic Cookie BarsMagic Cookie Bars
Printable Version
Ingredients
  • 1/2 cup butter, melted
  • 1 1/2 cups graham cracker crumbs
  • 1 (14 ounce) can Sweetened Condensed Milk
  • 2 cups semisweet chocolate morsels
  • 1 1/3 cups flaked coconut
  • 1 cup chopped nuts (I used almonds because they were on hand.)
Directions
  1. Heat oven to 350 degrees F (325 degrees for glass dish). Coat 13x9-inch baking pan with no-stick cooking spray.
  2. Combine graham cracker crumbs and butter. Press into bottom of prepared pan. Pour sweetened condensed milk evenly over crumb mixture. Layer evenly with chocolate chips, coconut and nuts. Press down firmly with a fork.
  3. Bake 25 minutes or until lightly browned. Cool. Cut into bars or diamonds. Store covered at room temperature.
Variations

Substitute 1 cup (6-ounces) butterscotch flavored chips* for 1 cup semi-sweet chocolate chips and proceed as directed above.

From Eagle Brand 

Read more!

Wednesday, November 11, 2009

Veggie Pasta with Herb Butter and Parmesan

Veggie Pasta Talk about simple. This pasta is full of flavor and takes just a few minutes. You can use any veggies you want, but I find the pre-packed bags of vegetables at the grocery store makes this recipe a snap. For this pasta I used broccoli, cauliflower and baby carrots along with some celery and capers I had in the fridge.

Veggie Pasta with herb butterThe ultimate flavors come from my recipe for herb butter. The herb butter has Italian spices and of course fresh garlic. To begin, I put a sauté pan on medium-low heat and used the herb butter to sweat and steam the veggies. You don’t want the heat too high or else the butter will burn and the veggies won’t get a chance to cook properly. You can also steam the veggies separately before adding them to the pasta.

Once the veggies were done (tender, but still with a little bite), I turned off the stove top and sprinkled some shredded parmesan over the top. I then added the pasta and mixed all the ingredients together in the pan as the parmesan quickly melted. Just transfer to a plate with tongs and you’re done.

I love this recipe because it’s fast and simple. The aroma of garlic from the herb butter along with wonderful, gooey blobs (is that the right word?) of parmesan. The celery seems to be best at soaking up the flavor of the herb butter and the little, salty capers fit right in.

Easy Veggie PastaThis is one of those recipes you don’t really need exact measurements. The pictures above could probably feed two, even though I scarfed it down myself. :-)

I used about a one inch circumference of angel hair pasta. In the sauté pan, I just added a nice handful of veggies and used two hefty tablespoons of the herb butter. 1/2 to 3/4 cup of shredded parmesan should also do the job.

Butter, cheese and pasta don’t sound very health conscious, but at least you’re getting your veggies.


Read more!

Monday, November 9, 2009

Homemade Sweetened Condensed Milk

Homemade Sweetened Condensed MilkDon’t you hate it when you have every possible ingredient for a recipe except one thing that requires a trip to the store. Well it turned out I had four ingredients to make the one thing I needed. Who knew sweetened condensed milk was so easy to make at home? And this is no stretch of the truth, it tasted just like the famous Eagle Brand.

Amazingly I have a couple boxes of nonfat dry milk which is the prime ingredient for this recipe. All you need is a little sugar, butter, water and a blender and you’re done. I did find that the water may not be enough. Use the amount listed and if needed, add a little more water until it reaches the consistency like that from the can.

I could eat this stuff all by itself. When I was kid we used sweetened condensed milk for snow ice cream. Freshly fallen snow (we lived in the mountains) mixed with some of the sweetened condensed milk became instant ice cream flavor.

Homemade Sweetened Condensed MilkPrintable Version
Ingredients

1 c. nonfat dry milk
1/3 c. boiling water
2/3 c. sugar
3 tbsp. melted butter

Directions

Place all ingredients in mixing bowl and mix until well blended. Makes the equivalent of 1 can of sweetened condensed milk, about 1 1/3 cups.

Read more!

Friday, November 6, 2009

Pumpkin Brioche Bread Pudding with Caramel Sauce

Pumpkin Brioche Bread Pudding with Caramel SauceDuring my trip to Ketchum, Idaho, I tasted some wonderful pumpkin brioche bread pudding at the Ketchum Grill. It was so good I knew I had to try making it at home.

Little did I know, my first big challenge was finding a bakery with Brioche. I made a few phone calls and was shocked some “bakeries” didn’t even know what brioche was. I made a mental note to avoid going to their shops in the future. Finally I found Rustica Bakery in Minneapolis, which bakes fresh brioche on Tuesdays. So that would be my day.

Pumpkin Brioche Bread Pudding

Brioche is a rich yet light bread made with ample amounts of butter and eggs. It has a dark, golden, and flaky crust from an egg wash applied before and after proofing. The crust is a little too tough for bread pudding, so you’ll have to slice it off. But the texture and crumb of the bread is great to soak up the cream, milk, sugar and of course pumpkin. You can also use white bread, but I wouldn’t use a dense bread like Pepperidge Farm or Brownberry. This is where good old Wonder Bread is your best bet.

The bread pudding itself is very moist but not runny like some bread puddings (thank goodness). The pumpkin flavor is not overpowering, but it’s definitely pumpkin. It’s a great flavor for the fall and through the holidays. But the homemade caramel sauce really ties it all together with a rich sweetness alongside some refreshing ice cream.

Hopefully you have a full house, to share this with because it’s addictive. I had leftovers the next morning and it reminded me of French toast. I wondered if I could cut a square in half and fry it up. Sounds like a good breakfast worth trying.

Printable Version
Ingredients
Pumpkin Bread Pudding

2 Tablespoons butter, melted
Granulated sugar for dusting the pan
7 egg yolks
1/2 cup sugar
2 cups whole milk
2 cups heavy cream
1 1/2 cups unsweetened pumpkin puree
1 1/2 teaspoons vanilla extract
1 1/2 teaspoons ground cinnamon
1/2 teaspoon ground ginger
1/4 teaspoon ground nutmeg
1/8 teaspoon ground allspice
1/8 teaspoon ground cloves
1 1/2 teaspoons kosher salt
7 cups of cubed brioche or white bread (crusts removed, cut into 1/2-inch cubes)

Caramel Sauce (here’s my post about this awesome caramel sauce)

3/4 cup sugar
1/4 cup water
1/4 teaspoon kosher salt
Pinch of cream of tartar
1 cup heavy cream

Directions

Prepare pan: Preheat oven to 375°F. Butter a 13x9 baking dish. Dust with granulated sugar.

Prepare and Bake Bread Pudding: Whisk the egg yolks in a bowl with the 1/2 cup sugar.  Heat the milk and cream in a saucepan over medium heat until steamy but not boiling. Turn off the heat and add the pumpkin puree, vanilla, cinnamon, ginger, nutmeg, allspice, cloves and salt.  Stir to mix. Slowly, pour over the egg yolks/sugar mixture while whisking. Gently fold in the bread cubes. Transfer the pudding mixture to baking pan.  Bake until nicely browned and set, about 40 minutes.

Caramel Sauce: Combine 3/4 cup sugar, 1/4 cup water, salt and cream of tartar in a small saucepan. DO NOT STIR. Bring to a boil and cook until the caramel browns. When the caramel is medium brown, carefully add 1 cup of cream and simmer.

Serve: Cut bread pudding into large squares or just spoon onto a plate. Spoon a layer of caramel on top. Dust with powdered sugar and serve warm. Serve alongside caramel swirl ice cream or even better, some salted caramel ice cream.


Read more!

Wednesday, November 4, 2009

Grilled Cheese with Dilled Havarti and Sliced Apples

Havarti Grilled Cheese with ApplesIt’s getting downright chilly. So why not warm yourself up with some gooey grilled cheese sandwiches.

When most people think of grilled cheese, they might imagine American cheese on white bread. Well, I can barely eat that stuff now. Grilled cheese should have real cheese in it. There’s nothing better than some toasty bread with sharp cheddar cheese. But this recipe is a little different with the addition of fall fruit.

Havarti Grilled Cheese with ApplesA hearty wheat bread with dilled havarti cheese and some fresh fall apples sounded like a perfect fall lunch. After all fruit and cheese go together. And I was pleasantly surprised at how all the flavors melded together so well. The sweetness of the apples cut through the richness of the cheese. The wheat breads adds a wonderful nutty flavor. And I always love the fresh and invigorating flavor of dill

Havarti Grilled Cheese with ApplesAlmost any grocery store has Havarti with dill. It’s a semi-soft white cheese with lots of flavor. The dill gives it that refreshing taste that is made more apparent after it’s melted. For the apples, super-thin slices of Granny Smiths or other firm apples (Gala?) will go great with this. I used a mandoline to slice the apples for the perfect thickness.  

Havarti Grilled Cheese with Apples

Printable Version
Ingredients
  • 1-2 thinly sliced apples
  • Salted butter, softened
  • Honey whole wheat bread
  • Havarti dill cheese
Directions
  1. Slice apples thinly with a slicer or mandoline.
  2. Heat a large frying pan over medium-low heat. Meanwhile, spread butter on 1 side of each slice of bread. (I toast both sides with butter)
  3. Once the pan is warm, add 1 slice of bread buttered side down, and top with  the cheese and apples to your liking. Close with the second bread slice, buttered side up.
  4. Cook until bread is toasted and cheese is melted, about 3 minutes per side.
Read more!

Monday, November 2, 2009

Sam’s Club take-and-bake Pizza = Worst Pizza Ever

image Every now and then I go to Sam’s Club to get some deals on bulk items for the kitchen. As I walked to the register, they had some of their Member’s Mark brand take-and-bake pizzas on display for only $6.88. That’s a better price than some specials at Papa Murphy’s.

So I grabbed a Pepperoni Pizza and headed home. I preheated the oven and took the pizza out of it’s packaging. Then I realized the dough wasn’t really dough. It wasn’t even soft like dough. It seemed as if it was half-baked before getting shoved in the box. The outside edges were already pretty hard, so perhaps the faux-dough was also over baked.

I plopped it in the oven, followed the directions and 14 minutes later dinner was done. I grabbed my pizza cutter and started making slices, but then I noticed it took great strength to cut all the way through the crust. What the hell did I just buy?

I finished cutting the pizza and then took a bite. The toppings were bland. It felt like I was eating cardboard with tomato sauce. This was absolutely the worst pizza I have ever tasted. I ate two slices but couldn’t eat the edge of the pizza because it was too hard to actually bite into. Once I was finished eating, I realized the roof of my mouth was all torn up. What a horrid experience.

I heard Costco and Sam’s sibling, Walmart, have good pizzas. So maybe those are worth a try. But frankly, you’ll be better off getting the cheapest frozen pizza at the grocery store than buying this thing. If you need a take-and-bake pizza, for a little more change, grab a $7.99 coupon and head to Papa Murphy’s. At least then you’ll know they made the dough that day.

The roof of my mouth will thank you.

Read more!

Friday, October 30, 2009

Herb Butter

Herbed Butter Butter goes with everything right? But sometimes it needs something more. I love this recipe for herbed butter. Dried herbs and fresh garlic is all you need.

Radicchio pasta-4241It goes great on a warmed French baguette, with some veggies and pasta or even on top of a baked potato. And don’t forget, fresh herbs will make this recipe even better.

Ingredients

1 stick salted butter (room temperature)

2 cloves garlic

1 tsp. dried oregano

1 tsp. dried thyme

1 tsp. dried basil

Mix all the ingredients until the butter if fluffier and then refrigerate.

Read more!

Wednesday, October 28, 2009

Easy Caramel Sauce

Easy Caramel Sauce I didn’t know caramel sauce could be this easy, but it is. And it tastes way better than the stuff from the bottle.

The process begins by adding sugar, water and a touch of salt to a saucepan. Once the mixture begins boiling, watch it carefully but do not stir. I used a non-stick saucepan and it made the process a lot easier.

As the sugar mixture boils, it will get very thick. Then you’ll start seeing come color in your clear sugar. First some blond shades and then a richer medium brown. Once it begins to show some real color, begin stirring until the sugar is evenly medium brown and remove from the heat.

Caramel Now you’ll want to be careful as you add the cream, because it’s cold cream meeting molten sugar. Slowly add the cream and whisk vigorously so that the sugar doesn’t form a ball as it hits the cream. Whisk until fully mixed and then just let it simmer for 5-10 minutes.

The caramel is thinner than you would expect for a caramel sauce, but as it cools it thickens up nicely. If you’re using the sauce for something hot, it won’t stay as thick however.

This sauce would be great on top of ice cream, as a dip for apple slices, or with some bread pudding.

Ingredients:

3/4 cup sugar
1/4 cup water
1/4 teaspoon kosher salt
Pinch of cream of tartar (don’t sweat it, if you don’t have any on hand. I doubt a pinch of anything will change the consistency)
1 cup heavy cream

Directions:

1. Combine 3/4 cup sugar, 1/4 cup water, salt and cream of tartar in a small saucepan. DO NOT STIR.

2. Bring to a boil. Once the sugar begins to brown, stir until evenly medium brown.

3. Then carefully add 1 cup of cream and simmer for 5-10 minutes.

4. Remove from pan into a heat-safe bowl and let cool before refrigerating.

Read more!

Monday, October 26, 2009

review: Ketchum Grill - Ketchum, Idaho

Ketchum Grill During my recent trip to the Trailing of the Sheep festival in Ketchum, Idaho, we knew we had to stop for a nice dinner somewhere. After looking at restaurants online and some of their reviews, we settled for the Ketchum Grill.

We had reservations at 8pm and the place was packed. Luckily at the entrance you’re met with some nice chairs and a very warm fireplace while you wait for your table.

Once we were called, we were seated at a small table for two, where I had to squeeze in hoping not to knock anything off a fellow diner’s table. They had the night’s specials on the wall and quite a few large parties. Our drink orders were taken and a few minutes later we were presented with some great bread.

One slice seemed to be wheat and had walnuts and a fruit of some kind and tasted nutty and flavorful. Another slice was white with fruit and also tasted great. I didn’t ask what kind it was, I just ate it.

Ketchum Grill By this time my water was empty, and the waiter seemed to disappear from our table. He was doing the best he could. Management seemed to give him a whole section of about 6-7 tables and one of those had a party of eight. I’m not sure what they were thinking because he couldn’t keep up.

Slow Roasted Lamb It took a while but then our food finally came. My mom ordered slow roasted lamb with Indian spices and mint yogurt (it was a sheep festival after all). I ordered the grilled peppered breast of duck with Idaho huckleberries and port.

I snuck a bite of the lamb and it was OK. It tasted like pot roast. For some reason I expected something a little more, especially with the price attached to it. It wasn’t dry but imagined it would be in some kind of wonderful pan juices. I’m not sure where the Indian spices were, because they weren’t in the meat. The mint yogurt didn’t really add anything to the dish when the meat was supposed to be the star. Basically, I could have made pot roast at home for a lot cheaper.

 Peppered Duck with Wild Huckleberries I ordered my duck medium. It was topped with an Idaho huckleberry sauce alongside some wild rice. The sauce wasn’t overly sweet and tasted pretty good. The duck breast was tough. I could barely cut through one of its stringy tendons inside the breast. I wasn’t pleased, but I ate it anyway. I’ve made duck breast at home twice, by roasting it. One time it came out wonderful and tender. Another time it came out tough. Perhaps it’s just a finicky bird to cook.

Inside Out German Chocolate Cake It was now time for dessert. We were full, but we weren’t going to leave without some dessert. My mom ordered the inside out German Chocolate Cake. Broiled coconut-pecan topping was layered in between rich chocolate cake, and topped with an almost too rich chocolate ganache.
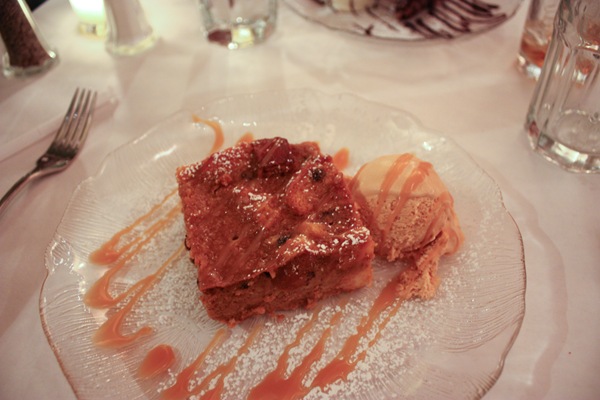
Pumpkin Brioche Bread Pudding I ordered the pumpkin brioche bread pudding with salted caramel ice cream. It was awesome. The pumpkin flavor was pronounced but not overdone and the housemade ice cream was creamy and delicious. The middle of the bread pudding wasn’t as warm as the outside, so I assume it was reheated, but I ate through that too. I wouldn’t want anything to go to waste.

Overall it was an OK place to eat, and my mom seemed happy. But it wouldn’t be my first choice. I’d need to experience the other fine dining hot spots in Ketchum, before giving Ketchum Grill a second look.

Read more!